Why My First AI Images Looked Like Nightmares
Let me guess: you typed something like "cute puppy in a park" into an AI generator, and the picture you got back had seven legs and no eyes. Yeah, I’ve been there too. Getting a machine to draw exactly what's inside your head feels like talking to a brick wall at first. But I promise it gets so much easier once you figure out the secret language these tools actually listen to. Let's fix your prompts right now.
The cat had six legs and two tails. The trees looked like they were melting into the sky. I felt so confused and a little bit annoyed. I thought I was doing something wrong, or maybe the software was just bad.
I spent hours trying different words, but nothing worked. It felt like I was speaking a language the computer didn't understand. My dream of making cool art was quickly turning into a headache.
I almost gave up entirely. I thought you needed to be a computer genius to get a decent picture. But then, I realized that the problem wasn't the AI. It was me.
I wasn't giving the right directions. I was being too vague. Once I changed my approach, everything clicked. Now, I want to show you how to avoid those same mistakes.
The Silent Frustration of Bad AI Art
What You Will Learn in 2 Minutes
- Why acting like a movie director fixes 90% of your AI image mistakes.
- How to use lighting words (like "golden hour") to make fake art look real.
- The simple trick of using "negative words" to remove extra fingers and weird faces.
- My personal copy-paste formula for getting the perfect picture every time.
Have you ever spent an hour trying to get an AI tool to make one specific thing? You type, click generate, and wait. Then you see the result and want to throw your mouse. It’s not just a waste of time. It’s genuinely draining.
Many people use these tools for their small businesses or personal blogs. When the images look weird, it looks unprofessional. This ruins the look of your website or social media page. It creates a lot of stress when you just want a simple photo.
Imagine needing a photo for a project that is due tomorrow. You try the AI tool, and it keeps giving you nonsense. Your heart starts to beat faster. You feel like you are losing control of your work.
This is a common struggle that many face right now. We have the power of a thousand artists in our hands, but we don't have the "instruction manual." That is why learning how to guide the AI is so helpful for your peace of mind.
Setting the Stage: Building Your Foundation
To get a great image, you have to treat the AI like a very talented but very literal child. It knows how to paint, but it doesn't know what you are thinking. You have to set the scene perfectly before it starts to work.
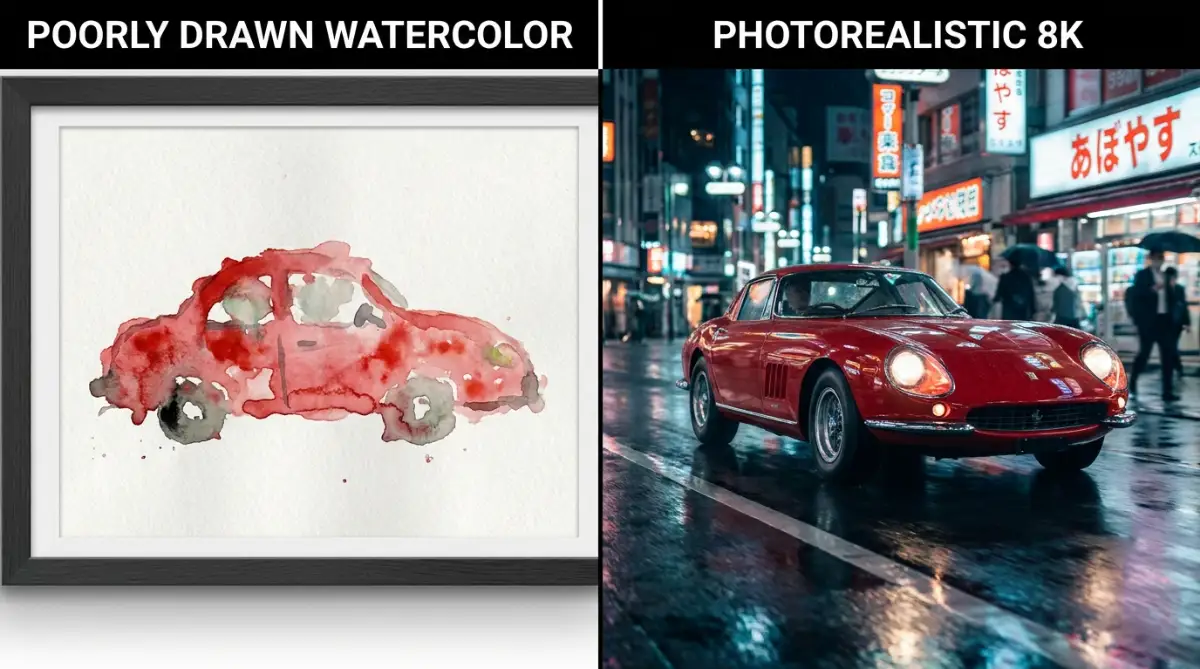
Start with the core subject. Instead of saying "a car," say "a vintage red sports car." Be very specific about what the main thing is. This keeps the AI focused on the right object.
Next, think about the background. A car on a "street" is boring. A car on a "rainy neon-lit street in Tokyo" is a story. The more details you add about the surroundings, the better the AI can fill in the gaps.
Myth vs. Fact: Do you need a giant prompt?
Myth: You have to write a 500-word essay to get a decent picture.
Fact: Less is often more! A short, 15-word sentence that clearly names the lighting, angle, and subject usually beats a massive, confusing paragraph every single time.
You should also mention the style of the art. Do you want it to look like a photo? Or do you want it to look like an oil painting? If you don't say anything, the AI will just guess, and it usually guesses wrong.
I once made a huge mistake by asking for a "beautiful landscape" without saying anything else. I got a flat, boring picture that looked like a cheap postcard. Now, I always specify the time of day and the type of light to make it look real.
Adding Texture and Lighting for Realism
Lighting is the secret sauce of great AI images. It’s what makes a picture look professional instead of fake. If you want something to look high-end, you have to talk about the light.

Use words like "golden hour" for a warm, soft glow. Or try "studio lighting" for a crisp and clean look. "Cinematic lighting" is great if you want your image to feel like a movie scene. These words tell the AI how to handle shadows and highlights.
Texture is another big thing. Talk about the materials in the image. Is the surface "polished chrome" or "rough wood"? Does the skin have "visible pores" or is it "soft and smooth"?
Adding these small details makes the AI work harder. It starts to add layers that you didn't even know you needed. This is how you move from a basic image to something that looks like a masterpiece.
Watch this helpful video to see these lighting tricks in action! It will show you exactly how to change your settings for the best results.
Choosing the Right Camera Angles
Think like a photographer when you write your prompts. The "angle" of the shot changes the whole mood. If you don't pick one, the AI usually goes for a boring, straight-on view.
Try using "low angle" to make your subject look powerful and tall. Use a "wide-angle lens" if you want to show a huge, epic landscape. A "macro shot" is perfect if you are focusing on something tiny, like a flower or an insect.
Even the lens type matters. Mentioning an "85mm lens" tells the AI to blur the background. This makes the subject pop out, just like in a professional portrait. It’s a simple trick that makes a huge difference.
You can also talk about the camera "focus." Tell the AI to have a "shallow depth of field." This means the background will be soft and out of focus. It gives your images a very expensive and high-quality feel.
Avoiding Prompt Overload
One of the biggest mistakes beginners make is writing prompts that are too long. They add every single word they can think of. This is called "prompt bloat," and it usually confuses the AI.
If you give too many instructions, the AI might ignore the most important ones. It starts to mix things up and produces a messy image. The key is to be descriptive but also clear and direct.
My Go-To Prompt Formula
If you feel stuck, just follow this easy cheat sheet:
- [Subject] + [Setting] + [Camera Angle] + [Lighting]
- Example: A sleepy golden retriever + sitting on a cozy rug + close-up portrait + soft morning window light.
Pick your most important words first. Focus on the subject, the light, and the style. Then add maybe one or two extra details. If the image isn't right, change one word at a time instead of rewriting the whole thing.
Keeping it simple helps the AI understand your main goal. Think of it like a recipe. If you add too many spices, you can't taste the food. Use just enough to make it perfect.
The Power of Negative Prompts
Sometimes, telling the AI what not to do is just as important as telling it what to do. Most advanced tools have a "negative prompt" box. This is where you put the things you want to avoid.
You can add words like "extra fingers," "blurry," "deformed," or "text." This helps clean up the final image. It acts as a filter to keep the bad stuff out.
I always use negative prompts when I am making pictures of people. It helps avoid those weird AI glitches that sometimes happen with hands and faces. It makes my workflow much faster because I don't have to regenerate as often.
If you find that your images always have a certain "ugly" color, put that color in the negative prompt. It’s a very powerful tool that many people forget to use. It gives you way more control over the final look.
Using Comparison for Better Understanding
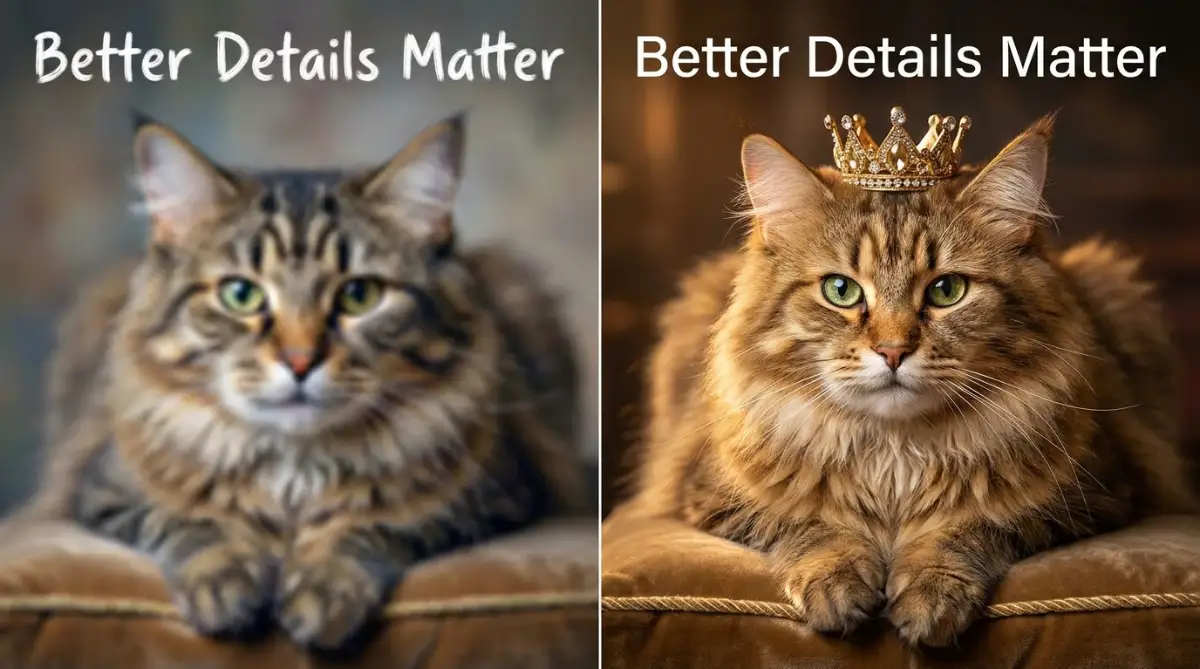
To really see what works, you should try the "A/B testing" method. Write a simple prompt and see the result. Then, add one specific detail—like "soft morning light"—and see how it changes.
By doing this, you learn exactly what each word does. You start to build a "library" of words in your head that you know will work. It’s like learning to play an instrument; you have to practice the small notes first.
Don't be afraid to fail. Every "bad" image is just a step toward a better one. I have a folder on my computer full of failed AI art. I keep them to remind myself how much I have learned.
When you see a change that you like, write it down. Keep a small note of the words that give you the best results. Soon, you won't even have to think about it. You will just know what to type.
Understanding the "Seed" for Consistency
If you find an image you love and want to make something similar, you need to know about "seeds." A seed is like a DNA code for an image. Every AI-generated picture has one.
If you use the same seed with a slightly different prompt, the AI will keep the same general layout. This is perfect if you want to create a series of images that all look like they belong together.
It helps you keep your "brand" consistent. If you are a blogger, you might want all your images to have the same "vibe." Using seeds is the best way to do that. It takes away the randomness of the AI.
Most people skip this part because it sounds technical. But it’s actually very easy once you find where the seed number is hidden in your software settings. It’s a total game-changer for serious creators.
Why Emotion Matters in Prompts
Don't just describe what the image looks like. Describe how it should feel. Words like "peaceful," "energetic," "lonely," or "mysterious" change the way the AI picks colors and shadows.
An "old house" looks one way. A "creepy, mysterious old house" looks completely different. The AI understands these emotional cues quite well. It uses them to set the overall mood of the piece.
This is what makes your art stand out. Most people just focus on the objects. If you focus on the feeling, your images will connect more with the people who see them. It gives the art a "soul."
I always try to think of one emotion before I start typing. It helps me stay focused on the goal. It makes the final result feel more like real art and less like a computer-generated file.
The Role of Color Palettes
Color is another thing that people often leave up to the AI. But you should take control of it. Instead of letting the AI pick random colors, suggest a palette.
Try words like "pastel colors," "monochrome," or "vibrant neon." You can even mention specific colors like "deep blues and oranges." This ensures that the image matches the theme of your website or project.
Colors affect how we feel when we look at a picture. Warm colors like red and yellow feel cozy. Cool colors like blue and green feel calm. By choosing the colors yourself, you are controlling the viewer's experience.
It’s a very simple step, but it makes your prompts much more "actionable." It tells the AI exactly what you want the final "look" to be. It removes one more piece of guesswork from the process.
Learning from the Community
One of the best ways to get better is to look at what others are doing. Many AI art websites show you the prompts that people used to create their images. Study them.
See what words they use. Notice how they structure their sentences. You will see that most great artists use a very similar pattern. They start with the big picture and then add specific details.
Don't just copy them, though. Take their ideas and mix them with your own. That is how you find your own unique style. The AI community is very helpful, and there is always something new to learn.
I spend at least ten minutes every day just looking at other people's work. It gives me fresh ideas and keeps me inspired. It’s like going to a digital art gallery every morning from my desk.
Final Thoughts on Starting Your Journey
Mastering AI prompts is not about being a genius. It’s about being patient and curious. It’s about learning how to describe the world in a way that a machine can understand.
Start small. Use the tips we talked about today. Focus on your lighting, your angles, and your emotions. Don't worry about making mistakes—that’s where the best learning happens.
You have an incredible tool at your fingertips. Now you have the strategies to use it well. Go out there and start creating something amazing. I can't wait to see what you come up with!
Taking Your AI Art to the Next Level
Now that you have the basics down, it is time to look at the more advanced ways to talk to these machines. Many people stay at the surface level, but the real magic happens when you understand the deeper layers of prompting. Think of it like moving from a point-and-shoot camera to a professional DSLR.
One secret I found is the use of iterative refining. This means you don’t just write one prompt and walk away. You start with a base idea and slowly add or remove words based on what the AI gives you. It is a conversation, not a single command. If the AI gets the lighting right but the colors wrong, you keep the lighting words and swap the color words.
Another advanced trick is using artist names to guide the style. While you don't want to copy someone exactly, mentioning a style like "Studio Ghibli" or "Cyberpunk" gives the AI a huge library of colors and shapes to pull from. This helps the tool understand the "vibe" you want much faster. It creates a shortcut to a professional look without you needing to explain every single brushstroke.
You should also think about the weight of your words. In many tools, the words at the very beginning of your prompt have more power than the ones at the end. If you want a specific object to be the main focus, put it first. If you put it at the end of a long sentence, the AI might make it small or hide it in the background. Understanding this hierarchy is a huge part of ai-reality-check-breaking-down-machine-learning-myths-for-beginners because it shows the AI is just following a mathematical path, not reading your mind.
For those who want to stay consistent over a long time, I suggest keeping a prompt journal. I use a simple digital note to save the prompts that worked perfectly. Whenever I need a new image for a post, I go back to my "winning" list and just change the subject. This saves me hours of guessing and keeps my work looking clean and uniform.
Pro Tip: I once spent three hours trying to get a specific blue sky until I realized I was using too many adjectives. I stripped it back to three simple words, and the AI finally got it right. My mistake was trying to be too "poetic" instead of being clear. Sometimes, less really is more when you are working with digital tools.
To get the most out of your creative workflow, you might want to look into the-ultimate-guide-to-automating-daily-tasks-without-writing-a-single-line-of-code. Learning how to build a system around your art creation will make you much more productive. It allows you to spend more time on the big ideas and less time on the boring clicking.
The Hidden Traps That Ruin Your Progress
It is very easy to fall into certain traps when you first start seeing success with AI art. One of the biggest mistakes is over-complicating the prompt. You might think that adding "4k, 8k, hyper-realistic, super-detailed, master-piece" will make the image better. In reality, most modern AI tools already try to make things look good. Adding these "power words" can actually clutter the image and make it look "plastic" or fake.
Another emotional hurdle is the frustration with small errors. We have all seen the "spaghetti fingers" or the strange eyes that AI sometimes makes. Many people see this and get angry, thinking the tool is broken. They delete the whole prompt and start over. This is a mistake. Instead of starting over, try to adjust the camera angle or use a negative prompt to remove "deformed hands."
If you don't handle your data and prompts correctly, you could also run into security issues. Always be careful about what personal info you might accidentally put into a public AI tool. For more on staying safe, check out how-to-secure-your-personal-data-on-cloud-computing-platforms. It is a good habit to keep your professional work and your personal data separate.
Another common pitfall is losing your own voice. It is so easy to let the AI do all the thinking. If you just take the first thing it gives you, your art will start to look like everyone else’s. You need to keep pushing the AI to match your vision. Don't be lazy. If it’s not exactly what you wanted, keep tweaking it until it feels right to you.
Finally, many people ignore the lighting and shadows in their prompts. They focus only on the object. This leads to flat, boring images that look like stickers. If you forget to describe the light, you lose the depth that makes an image look real. This is a very common reason why people get bored with AI art—they feel like everything they make looks the same.
To understand how these systems can sometimes be used to trick us, it is helpful to look at how inside-the-mind-of-a-social-engineer-spot-manipulative-tactics works. Just like a prompt guides an AI, certain words can guide human behavior. Being aware of this helps you stay in control of the tools you use every day.
Reaching Your Creative Peak
Working with AI should be a joy, not a chore. When you start to see the machine as your partner, your stress levels will drop. You will stop fighting the tool and start dancing with it. This shift in mindset is what separates the casual users from the true experts.
I want you to feel the excitement I felt when I finally made an image that looked better than what I had in my head. It is a powerful feeling to create something beautiful in just a few seconds. This technology is a gift for anyone who has ideas but perhaps lacks the years of training to paint or draw by hand.
The best way to keep your skills sharp is to build a solid routine. Just like a writer writes every day, an AI artist should "prompt" every day. Even five minutes of playing with new words can teach you something new. If you are working from home, you might find how-to-build-an-unbreakable-morning-routine-for-remote-workers helpful to find that extra time in your day.
Remember that the tech is always changing. What works today might be even easier tomorrow. Stay curious and keep testing new things. There is no "right" way to be creative, only your way. Trust your gut and let your imagination run wild.
I truly believe that we are entering a new age of human creativity where the only limit is our own mind. I want you to take these tips and start experimenting right now. Don't wait for the "perfect" time—the perfect time is when you click that "generate" button today. My best advice is to have fun with the process and never stop asking "what if?"
Your Top Questions About AI Prompts
Why do my AI images always have weird hands or faces?
This usually happens because the AI struggles with complex small details like fingers. To fix this, try using a "negative prompt" for "deformed hands" or try a "close-up" shot where the hands are not visible. You can also look at research from sites like OpenAI to see how they are improving these models.
Is it better to write short or long prompts?
Medium-length prompts are usually the best. You want enough detail to be specific, but not so much that the AI gets confused. Start with a simple sentence and add 2 or 3 descriptive words for the best balance.
Can I use these images for my professional blog?
Yes, most AI tools allow you to use the images, but you should always check the specific terms of the tool you are using. Make sure your images look high-quality so your site stays professional. For design standards, checking out Adobe's creative blogs can give you great ideas for visual layouts.
How do I get a consistent style for my brand?
The best way is to use "seeds" or keep the same "style" keywords in every prompt. If you always use "soft pastel colors" and "minimalist style," your images will look like they belong together. This is a great way to build a recognizable look for your readers.
Does the order of words really matter that much?
Yes, the first few words are the most important. If you want a "blue dog," put "blue dog" at the start. If you put it at the end of a long list of house descriptions, the dog might end up being small or not blue at all.
Disclaimer: This article is for educational purposes only. AI image generators are third-party software, and their terms of service can change. Always ensure you have the rights to use generated images for your specific project. We do not promote any specific software as the "best" and suggest trying multiple tools to see what fits your needs. Please follow all copyright laws and social media guidelines when sharing your creations online.
Author Note: I have spent a lot of time testing these strategies to make sure they actually work for real people. My goal is to help you save time and enjoy the creative process more. I hope this guide helps you make something you are truly proud of!